Decision Tables
Also known as: Cause and Effect Tables
What are Decision Tables?
A decision table is a framework for describing a set of related decision rules.[1] So what’s a decision rule? Well, a decision rule is a set of criteria that need to be met before an action is taken.[1] Or put another way, a set of criteria in a given circumstance that define which action is taken.
Decision Tables were once considered such a powerful way of defining and processing scientific and business problems that several computer languages were created adapted to make use of them as core structures. These included FORTAB, Structure Table Language, TABSOL, and DETAB-X.[1]
The Structure of a Decision Table
Each table is made up of four major sections. These are: [1]
- A set of condition stubs (the orange section of the table below)
- A set of actions stubs (the red section of the table below)
- A series of condition entries (the green section of the table below)
- A series of action entries (the blue section of the table below)
The original guidelines called for double-lines as separators of the sections[1], but they can be shown however you like as long as the sections are clearly defined. I used the black column and rows below as my separators and I recommend you use something similar to clearly separate that Condition and Action areas of the table.
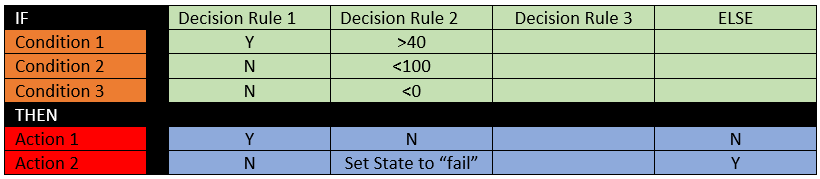
How to Read a Decision Table
A Decision Table is read vertically, with each single column defining a single decision rule. The very top row of Condition stubs should be read as if it has an If …
in front of it and the first row of the Action stubs should be read as if it had a Then …
in front it (actually added for illustrative purposes in the example above).
Each subsequent row of both the condition stubs and action stubs should be read as if they have an And …
in front of them.
So if you are reading the Decision Rule 1 column above, it would be read as:
- IF Condition 1 is true,
- AND Condition 2 is false,
- AND Condition 3 is false;
- THEN take Action 1.”
The combination of condition stubs and condition entries in a column define the conditions which apply or must be satisfied; and the combination of action stubs and action entries below in that column define the actions that are executed or which result as a response to the conditions above. [1]
Limited Entry
rules vs. Extended Entry
rules
Each condition entry in a decision rule column should have a value assigned for the state of the condition stub in that rule. However, there are two types of entries. These are limited
entries and extended
entries.[1]
In a limited entry
row, the entire condition that must be met is specified in the stub and the entry value is typically one of three basic values. These values are: [1]
- Y – Indicating that the condition in the stub must be satisfied
- N – Indicating that the condition in the stub must NOT be satisfied
- I – Indicating that the condition in the stub is immaterial (also sometimes indicated with an empty cell)
Also, for limited entry
rules, each action entry should be either a Y
or N
value. For example, the Decision Rule 1 column in the table above is an example of a limited entry
rule.
In an extended entry
rule, the row value in the decision rule column contains part of the condition logic that must be met or the action logic to be executed; and the stub alone does not provide enough information to fully define the condition or action. The Decision Rule 2 column above is an example of an extended entry
rule.
Else
Columns
Finally, sometimes a decision table will contain an ELSE
column at the far right. This is a single decision rule that essentially says that if any of the previous rules in table (to the left of the ELSE column) were not triggered, than take the action(s) specified in the ELSE column. This is a way of simplifying a decision table where only certain condition sets require specialized responses and all other conditions can be responded to with the same action.
Why should I use Decision Tables?
Decision Tables are excellent ways to document and communicate complex business rules or logic. This is especially true when compared to a narrative form of documentation (text only), structured narrative text like Planguage, and even some other diagramming techniques like Decision Trees.
Decision Tables are generally used when the order of conditions to be evaluated is immaterial. When the order of condition evaluation is important, a Decision Tree is often a better technique. [3]
However, sometime the resulting decision tree would be too large to be easily understandable. And in that situation it may still be better to use a Decision Table with modifications and annotations to indicate that the conditions MUST be evaluated in a certain order.
For business analysts, they are particularly useful for: [1, 4]
- Analyzing complex business logic for:
- Completeness (to make sure you have covered every possibility that needs to be supported)
- Inconsistencies (do any rules clash)
- Redundancies (can you consolidate some logic)
- Documenting and Verifying business logic where multiple conditions apply. This is particularly true when:
- Verifying logic with stakeholders
- Communicating logic to systems staff and programmers
- Creating test cases in order to validate a solution
How do I create a Decision Table?
For a demonstration of how to create a Decision Table, I am going to use the same very simple login decision logic scenario I used for the demonstrating the logic version of a Decision Tree. This will also show the different size and readability trade-offs of each techniques results.
The login logic tree from the Decision Tree article is shown below:
Step 1
The first step in creating a Decision Table is to first decide what decision will be defined. In this case the decision could be stated as something like Has the user successfully logged into the web site?
Step 2
The second step in creating a Decision Table is to determine the number of conditions that may affect the decision. This becomes the number of rows in the Condition Stubs
part of the table.
In this example, the possible conditions include
- User ID provided?
- Is User ID valid?
- Is Account Status = Locked?
- Correct password for User ID provided?
So these become our Condition Stubs in a table like the one below:
| User ID Provided? |
| User ID Valid? |
| Account Status = Locked? |
| Password Correct? |
Step 3
The third step is to determine the number of potential actions that can be taken. Based on our Decision Tree above, the number of actions include:
- Request ID message
- Invalid ID message
- Account locked message
- Invalid Password message
- Successful login
These become our action stubs and our table fragment now looks like this:
| User ID Provided? |
| User ID Valid? |
| Account Status = Locked? |
| Password Correct? |
| Request ID message |
| Invalid ID message |
| Account locked message |
| Invalid Password message |
| Successful login |
Step 4
The fourth step is determine the number of decision rules that will be needed to fully populate the table given the number of conditions above and to add those empty rows to our new table.
This is done by raising the number of significant potential values (SV) to the power of the number of conditions (N).[2] So if you are creating a limited entry
table, only the Y
and N
values have any significance, so SV=2. Given that there are 4 condition stubs above, the number of columns needed for a full table would be 24 or 16.
So your in-progress decision table would now look like this:
| R1 | R2 | R3 | R4 | R5 | R6 | R7 | R8 | R9 | R10 | R11 | R12 | R13 | R14 | R15 | R16 | |
|---|---|---|---|---|---|---|---|---|---|---|---|---|---|---|---|---|
| User ID Provided? | ||||||||||||||||
| User ID Valid? | ||||||||||||||||
| Account Status = Locked? | ||||||||||||||||
| Password Correct? | ||||||||||||||||
| Request ID message | ||||||||||||||||
| Invalid ID message | ||||||||||||||||
| Account locked message | ||||||||||||||||
| Invalid Password message | ||||||||||||||||
| Successful login | ||||||||||||||||
Step 5
The fifth step is to start populating the table. Starting with the first condition, divide the number of columns (16) by the number of significant values (2) for that condition. You take this result and populate the columns of the first stub with that number of each significant values (so 8 Y
s and 8 N
s).
This results in the condition entries part of the table that would look like this:
| R1 | R2 | R3 | R4 | R5 | R6 | R7 | R8 | R9 | R10 | R11 | R12 | R13 | R14 | R15 | R16 | |
|---|---|---|---|---|---|---|---|---|---|---|---|---|---|---|---|---|
| User ID Provided? | Y | Y | Y | Y | Y | Y | Y | Y | N | N | N | N | N | N | N | N |
| User ID Valid? | ||||||||||||||||
| Account Status = Locked? | ||||||||||||||||
| Password Correct? | ||||||||||||||||
Step 6
Continue this process for each subsequent row except that rather than starting with the total number of columns, use the number of columns in the previous row that had a single value.
This results a second pass of the table conditions that look like this (as an example of the pattern).
| R1 | R2 | R3 | R4 | R5 | R6 | R7 | R8 | R9 | R10 | R11 | R12 | R13 | R14 | R15 | R16 | |
|---|---|---|---|---|---|---|---|---|---|---|---|---|---|---|---|---|
| User ID Provided? | Y | Y | Y | Y | Y | Y | Y | Y | N | N | N | N | N | N | N | N |
| User ID Valid? | Y | Y | Y | Y | N | N | N | N | Y | Y | Y | Y | N | N | N | N |
| Account Status = Locked? | Y | Y | >N | N | Y | Y | N | N | ||||||||
| Password Correct? | Y | N | Y | N | ||||||||||||
You would then continue that pattern with the rest of the condition entries which results in a conditions part of the table that looks like this:
| R1 | R2 | R3 | R4 | R5 | R6 | R7 | R8 | R9 | R10 | R11 | R12 | R13 | R14 | R15 | R16 | |
|---|---|---|---|---|---|---|---|---|---|---|---|---|---|---|---|---|
| User ID Provided? | Y | Y | Y | Y | Y | Y | Y | Y | N | N | N | N | N | N | N | N |
| User ID Valid? | Y | Y | Y | Y | N | N | N | N | Y | Y | Y | Y | N | N | N | N |
| Account Status = Locked? | Y | Y | N | N | Y | Y | N | N | Y | Y | N | N | Y | Y | N | N |
| Password Correct? | Y | N | Y | N | Y | N | Y | N | Y | N | Y | N | Y | N | Y | N |
Step 7
The next step to identify which actions will be taken as a result of a given set of conditions by placing an X
in any action entry that will be executed for the conditions in the column above.
Using our Decision Tree logic above as an example of the logic that would apply, the action entries section of the table would be populated like this:
| R1 | R2 | R3 | R4 | R5 | R6 | R7 | R8 | R9 | R10 | R11 | R12 | R13 | R14 | R15 | R16 | |
|---|---|---|---|---|---|---|---|---|---|---|---|---|---|---|---|---|
| User ID Provided? | Y | Y | Y | Y | Y | Y | Y | Y | N | N | N | N | N | N | N | N |
| User ID Valid? | Y | Y | Y | Y | N | N | N | N | Y | Y | Y | Y | N | N | N | N |
| Account Status = Locked? | Y | Y | N | N | Y | Y | N | N | Y | Y | N | N | Y | Y | N | N |
| Password Correct? | Y | N | Y | N | Y | N | Y | N | Y | N | Y | N | Y | N | Y | N |
| Request ID message | X | X | X | X | X | X | X | X | ||||||||
| Invalid ID message | X | X | X | X | ||||||||||||
| Account locked message | X | X | X | X | ||||||||||||
| Invalid Password message | X | |||||||||||||||
| Successful login | X | |||||||||||||||
Step 8
The next step in creating a Decision Table is to analyze the table and determine if it can be simplified by the use of I
(Immaterial) values and/or an Else
column. This is essentially checking for redundant columns where different sets of conditions all lead to the same result.[5]
In this case half the decision table is driven by a single condition of whether the user entered a User ID or not. So we could simplify the table by placing all of those N
options into a single ELSE
column like the table below:
| R1 | R2 | R3 | R4 | R5 | R6 | R7 | R8 | ELSE | |
|---|---|---|---|---|---|---|---|---|---|
| User ID Provided? | Y | Y | Y | Y | Y | Y | Y | Y | N |
| User ID Valid? | Y | Y | Y | Y | N | N | N | N | I |
| Account Status = Locked? | Y | Y | N | N | Y | Y | N | N | I |
| Password Correct? | Y | N | Y | N | Y | N | Y | N | I |
| Request ID message | X | ||||||||
| Invalid ID message | X | X | X | X | |||||
| Account locked message | X | X | |||||||
| Invalid Password message | X | ||||||||
| Successful login | X | ||||||||
Looking at the resulting table above, it also becomes clear that 4 of the columns are driven entirely by the condition of whether the User Id that was provided is valid or not. We can further consolidate those 4 columns into 1 by making the 3rd and 4th condition stubs I
Immaterial as in the new table below:
| R1 | R2 | R3 | R4 | R5 | ELSE | |
|---|---|---|---|---|---|---|
| User ID Provided? | Y | Y | Y | Y | Y | N |
| User ID Valid? | Y | Y | Y | Y | N | I |
| Account Status = Locked? | Y | Y | N | N | I | I |
| Password Correct? | Y | N | Y | N | I | I |
| Request ID message | X | |||||
| Invalid ID message | X | |||||
| Account locked message | X | X | ||||
| Invalid Password message | X | |||||
| Successful login | X | |||||
And looking at the table above, it becomes apparent that two of the columns are driven entirely by the Account Status = Locked condition and the validness of the password is immaterial. This lets us further consolidate the table to look like the one below:
| R1 | R2 | R3 | R4 | ELSE | |
|---|---|---|---|---|---|
| User ID Provided? | Y | Y | Y | Y | N |
| User ID Valid? | Y | Y | Y | N | I |
| Account Status = Locked? | Y | N | N | I | I |
| Password Correct? | I | Y | N | I | I |
| Request ID message | X | ||||
| Invalid ID message | X | ||||
| Account locked message | X | ||||
| Invalid Password message | X | ||||
| Successful login | X | ||||
Step 9
Up to now we have only discussed a Decision Table that uses limited entry
rules. But how would you handle an extended entry
rule set? In order to show that I am going to modify the Decision Table we have been creating up to this point in order to add a new condition and a new action.
The new condition will be Number of failed logins
. And the new action will be Lock Account
. If my business logic states that after 3 failed login attempts (invalid password) an account is locked, my new table would initially look like this:
| R1 | R2 | R3 | R4 | R5 | R6 | R7 | ELSE | |
|---|---|---|---|---|---|---|---|---|
| User ID Provided? | Y | Y | Y | Y | Y | Y | Y | N |
| User ID Valid? | Y | Y | Y | N | Y | Y | Y | I |
| Account Status = Locked? | Y | N | N | I | N | N | N | I |
| Password Correct? | I | Y | N | I | N | N | N | I |
| Number of Failed Logins | 0 | 1 | 2 | 3 | ||||
| Request ID message | X | |||||||
| Invalid ID message | X | |||||||
| Account locked message | X | X | ||||||
| Invalid Password message | X | X | X | |||||
| Lock Account | X | |||||||
| Successful login | X | |||||||
Step 10
But the table above can also be consolidated because 3 of the columns (R3, R5, and R6) all lead to the same result. With this I can consolidate those 3 rules sets into a single column that uses the extended entry
logic of when the number of failed logins in less than 3. I can then simplify my new R5 to say that any time the number of failed logins is greater than 2, lock the account and show the account locked message.
| R1 | R2 | R3 | R4 | R5 | ELSE | |
|---|---|---|---|---|---|---|
| User ID Provided? | Y | Y | Y | Y | Y | N |
| User ID Valid? | Y | Y | Y | N | Y | I |
| Account Status = Locked? | Y | N | N | I | N | I |
| Password Correct? | I | Y | N | I | N | I |
| Number of Failed Logins | <3 | >2 | ||||
| Request ID message | X | |||||
| Invalid ID message | X | |||||
| Account locked message | X | X | ||||
| Invalid Password message | X | |||||
| Lock Account | X | |||||
| Successful login | X | |||||
You could do something similar if you have multiple ranges of a single condition that trigger the same result, with each range in its own column. So that R3 might have a Number of Failed Logins value of 0-2
and R5 might have a value of 3+.
Step 11
The last step is to validate that the Decision Table is correct.
A decision table is complete if, and only if, the following two rules are met: [1]
- Every decision rule contains at least one action
- Every possible transaction against the decision table satisfies one, and only one, decision rule
The first rule above is easy to check. The second rule is also fairly easy if your decision table uses limited entry
rules.
If your table contains ONLY limited entry
decision rules with either a Y or N condition entry (no I
’s), there are two simple checks you can take to make sure the table is complete.
- First, calculate the number of decision rules that should be present and validate you have that many. This is calculated by raising 2 to a power equal to the number of condition stubs you have specified (condition rows). So if you have specified 3 different condition stubs, you would need 23 = 8 decision rule columns to map all of the possible conditional states.[1]
- Second, check that for any given two rules, in at least one position, one condition entry contains “Y” and the other rule has an “N” at the same condition entry. [1]
But if you have any I
values in your condition entries, you generally need fewer rules (columns) to make a complete set. The way you check the number of needed rules when I
values are present is to say that each rule with an I
value in r
positions takes the place of 2r decision rules. [1]
So if you take a decision table with 3 condition stubs which would normally require 8 columns of decision rules if all entries were Y
or N
values; and the Decision Rule 1 contained an I
value in the 2nd and 3rd condition stubs, that first decision rule column would take the place of 22 = 4 decision rules. So if all other decision rules only had Y
or N
values, you would know your decision table should have 5 columns to be considered complete (Rule 1 which counts for 4, and then one column each for remaining 4 rules ((23 = 8) – (22 = 4) = 4 more columns)
Of course, if you use any ELSE
decision rules, the number of columns may be even less.
What Should the Results be?
The final result should be a decision table is complete and meets all of the validation criteria above.
The table below is I think somewhat more compact and easier to understand than the Decision Tree example we started off with. But if you can imagine a decision process with many more conditions to be evaluated, you can see how a tree structure could very quickly get very large and unwieldy. This is when Decision Tables become much more valuable.
| R1 | R2 | R3 | R4 | ELSE | |
|---|---|---|---|---|---|
| User ID Provided? | Y | Y | Y | Y | N |
| User ID Valid? | Y | Y | Y | N | I |
| Account Status = Locked? | Y | N | N | I | I |
| Password Correct? | I | Y | N | I | I |
| Request ID message | X | ||||
| Invalid ID message | X | ||||
| Account locked message | X | ||||
| Invalid Password message | X | ||||
| Successful login | X | ||||